Managed Workflow
NetShield's managed workflow takes care of managing the TCP/TLS connection for you. This is the easiest way to get started messaging your server.
NetShield does not provide a protocol on top of TCP/TLS. This means that "messages" may be split at boundaries. You're responsible for implementing your own protocol on top of NetShield.
Connecting To A TCP Server (Managed)
The first thing you'll probably want to do when using NetShield, is connect to a server (using a managed socket). To keep things simple, we'll start off with a regular/unsecured TCP server. If you want to get to know NetShield, we highly recommend using an interactive server application, like: Hercules for Windows, or NetCat on Linux. This'll allow you to see what is going on/send things to your game manually. You can also use your own server, however, this will increase the complexity, so we recommend using one of the above tools when starting out.
Once you have the tool up and running, you need to take note of the IP address of your computer. This will likely be 127.0.0.1 if you're running the server on the same computer as you're using NetShield on. You should also take note of the port your server is listening on. Once you have these two pieces of information, you can continue.
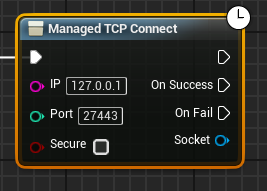
Open up a blueprint where you'd like to establish a connection. In here, add the "Managed TCP Connect" node, enter your IP address/Port, and ensure that Secure is unchecked. It should look something like the below:
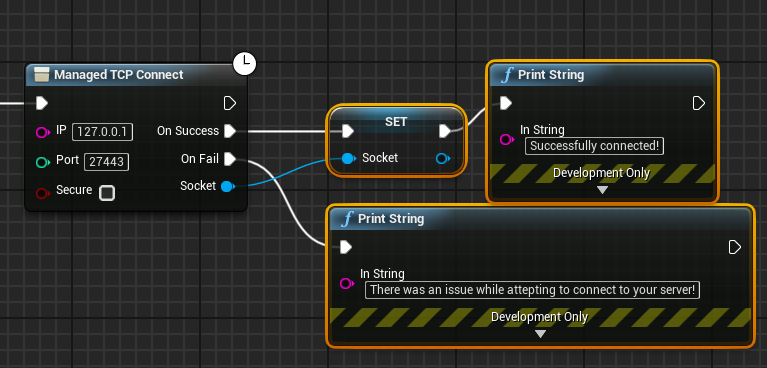
The "On Success" pin will be called whenever the socket manages to successfully connect, and the "On Fail" pin will be called if something goes wrong. I recommend you add a print statement to the "On Fail" pin, logging that something went wrong, and that you save the socket in a variable when everything succeeds. You should end up with something like the following:
When this piece of code executes, it'll try to connect you to the server. Try out if this works for you, and if your connection is having issues, then please view the Troubleshooting Section.
Writing Data (Managed)
The next thing you'll likely want to do, is writing some data. Assuming you saved your connection in a variable (see the previous section), we can drag that out as a variable in our graph. Now we'll want to decide on the type of data we want to send. As of right now, there are two options: Byte Data & String Data. String Data will allow you to send some text over the connection (that is automatically converted to its ascii byte representation by NetShield). Byte Data will allow you to send virtually anything over the socket connection, but also requires you to create a byte array from whatever you're trying to send (like an image). I'll cover both options below, and if you're getting started/playing around, I highly recommend using the string option.
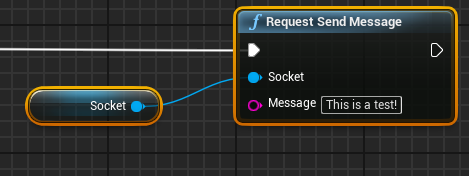
To send a string, create the "Request Send Message" node. Connect your socket to this node, and enter the message you'd like to send. You'll likely end up with something like the following:
When this is executed, NetShield will convert the string into its ASCII representation, and then send it over the socket. If you're using a tool like NetCat or Hercules, it should show up on your screen when the code is executed.
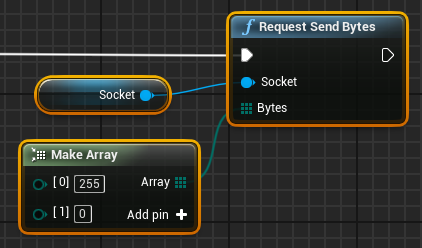
If you'd like to send a byte array instead, ensure you encode your data into a byte array. From here, add the "Request Send Bytes" node to your graph. Now connect your socket variable, and whatever source of bytes you want to send to the node. You'll end up with something like the following (NOTE: I'm using a Make Array node for testing here):
Once this code executes, NetShield will send the data over the socket connection to your server! Your server can then process this data and do whatever it wants with it!
Reading Data (Managed)
The managed version of NetShield uses events to notify your code when new data is available, and automatically presents you with it. This makes sure you don't have to worry about ensuring that there is any data available, or any complex matters like that.
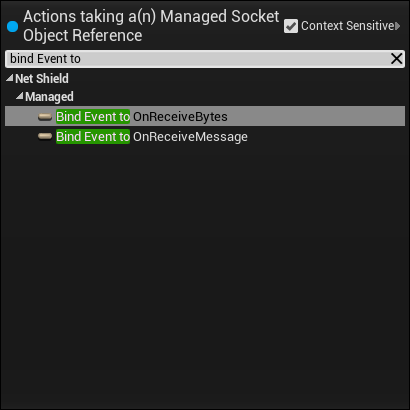
There are two events you can bind to that fulfil this task. These events are: OnReceiveBytes, and OnReceiveMessage. Much like writing, reading also supports the two types: byte data, and string data. We'll discuss the procedure of hooking the OnReceiveMessage event up, but it is identical for the byte version (other than the name and presented data).
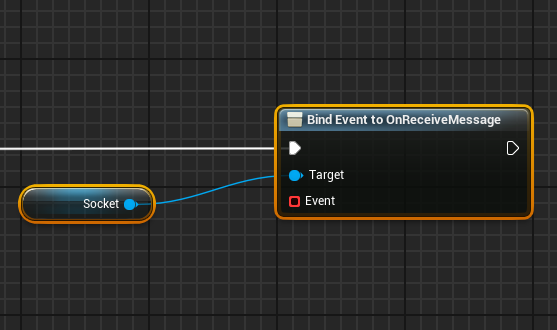
To hook up some code that will run whenever it receives a string, drag out of your socket connection, and create the "Bind Event to OnReceiveMessage" node. You'll likely want to connect the execution part of this to the "On Success" pin of your Managed Connect node. You'll end up with something like this:
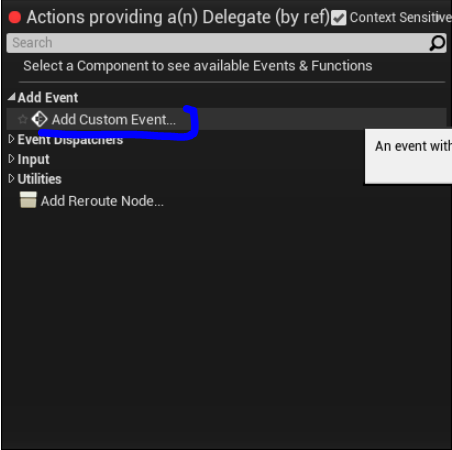
Now drag out of the Event input of this node, and choose Add Event >Add Custom Event, as can be seen below:
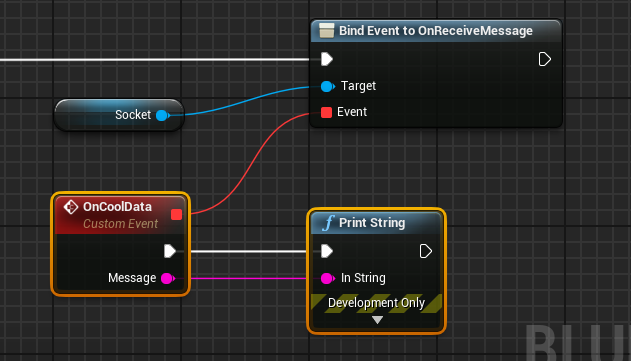
This will create an event for you to use. Feel free to give it any name you want. I personally chose to print the received data, and ended up with the below code:
For byte data, you can follow the same procedure, just binding to OnReceiveBytes, instead of OnReceiveMessage.
Securing your connection (Managed)
So now that you've gotten used to the managed socket approach of NetShield, you'll likely want to secure it. Please first ensure that you have a server that is capable of receiving secured connections. This means it is using SSL/TLS (and will likely be on another port). If you're just testing, or your server does not (yet) support SSL/TLS, we recommend taking a look at Stunnel. This is a tool that proxies/"wraps" your unsecured connection, into a secure one. Please note that there are some security concerns with this approach (as the data will be traveling in an unencrypted fashion between stunnel and your server), so use it with caution.
Now that that's taken care of, we get to the easy bit: All you need to do to secure the connection on the NetShield side, is checking the "Secured" checkbox, and updating your port (if applicable). You won't have to update your reads/writes/etc! You'll likely end up with something like the following:
