Local Login
The Local Login System is only recommended for applications with a small number of users.
For an overview of all login methods, please refer to this page.
Introduction & Warnings
Starting with TwiWorks version 1.0.14 (released for Unreal Engine 4.24 and later) comes a feature we're calling Local Twitch Login. The feature offers an alternative to setting up the hosted backend for applications such as highly customized streamer overlays, virtual productions and stream games where you're only using the TwiWorks functionality yourself, or for a small number of users.
Instead of sending the user to the hosted backend, TwiWorks will start its own local web server which serves up a simple page and script that allows users to log in to Twitch using the OAuth Implicit Flow. This avoids the need for hosting a backend (either locally or on a web server), and makes it easier to get up and running with the plugin.
Unfortunately this feature isn't a silver bullet that will work for all use cases. It is currently still experimental, and should be treated as such: unpredictable behaviour may occur, so we don't currently recommend it for production use.
We do NOT reccomend local login if you plan on distributing your appliaction to a general user audience. Not all users, firewall settings, virus scanners and more will take you kindly for starting an embedded local web server, and your end user might already be running their own applications on the port you set up for your game. This will result in an unreliable and frustrating experience for end users, so please reconsider using the backend setup if you fall into this category.
Twitch & Settings Setup
Before continuing, please make sure you have read the general information and warnings above. With that out of the way, start by creating a Twitch application if you haven't already. You can do this over at https://dev.twitch.tv - please refer to the backend-based login page for further guidance.
Next, you'll need to decide which port the local web server should be started on. We highly recommend you use a port number above 1024, and leave it at its default value of 8080 unless you have a reason to change this port (e.g. running a web application alongside your Unreal Engine app).
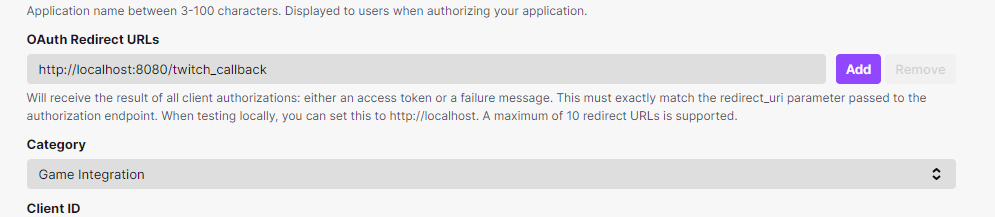
Now that you've decided on a port, you can add your callback URL it under the OAuth Redirect URLs section of your Twitch application. You'll want to use the following callback URL, replacing PORT with the port you selected in the previous step (e.g. 8080):
http://localhost:PORT/twitch_callback
Next, open up your TwiWorks settings by going to Edit > Project Settings and finding the Plugins > TwiWorks section. Now copy over the Client ID from your TwiWorks application, and paste it in the Client ID field of the project's settings. Also make sure the Local Login Port matches the port you selected in the previous step.
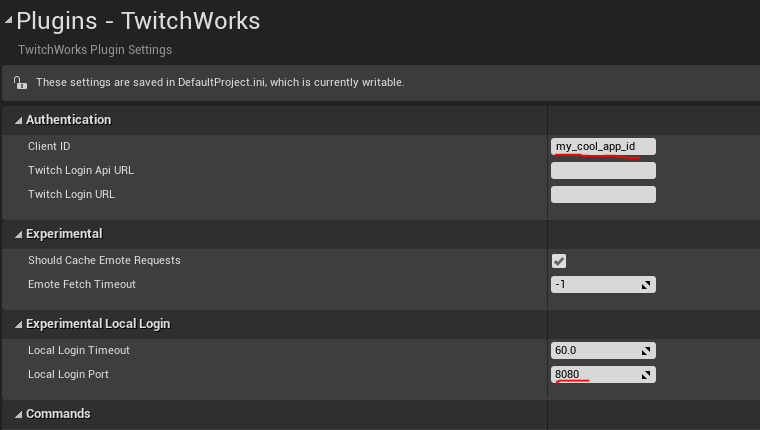
Once you've completed these steps, you've done the setup required and can move on to the Blueprints Usage section. If you're wondering what the Local Login Timeout variable is for, continue on reading.
The Local Twitch Login node will execute the OnSuccess pin as soon as it receives the token and completes the username login request, even if the user hasn't switched back to the game. This has its advantages, but also means that the node could get stuck if the user never completes the Twitch login yet switches back to the game.
To mitigate this potential scenario where the game gets stuck waiting for the user to log in, an automatic timeout has been implemented: if the user takes longer than this amount of time to complete the login, TwiWorks will automatically assume the login failed and act accordingly.
This Local Login Timeout variable contains the number of seconds TwiWorks will wait from the point of opening the user's browser to considering the request timed out, so feel free to modify it to suit your needs (taking potential 2FA delays into account).
Blueprints Usage
Before continuing, please make sure you have run through all of the steps described above. Failure to do so will lead to things not working the way they should in this section, and can be a real headache to debug.
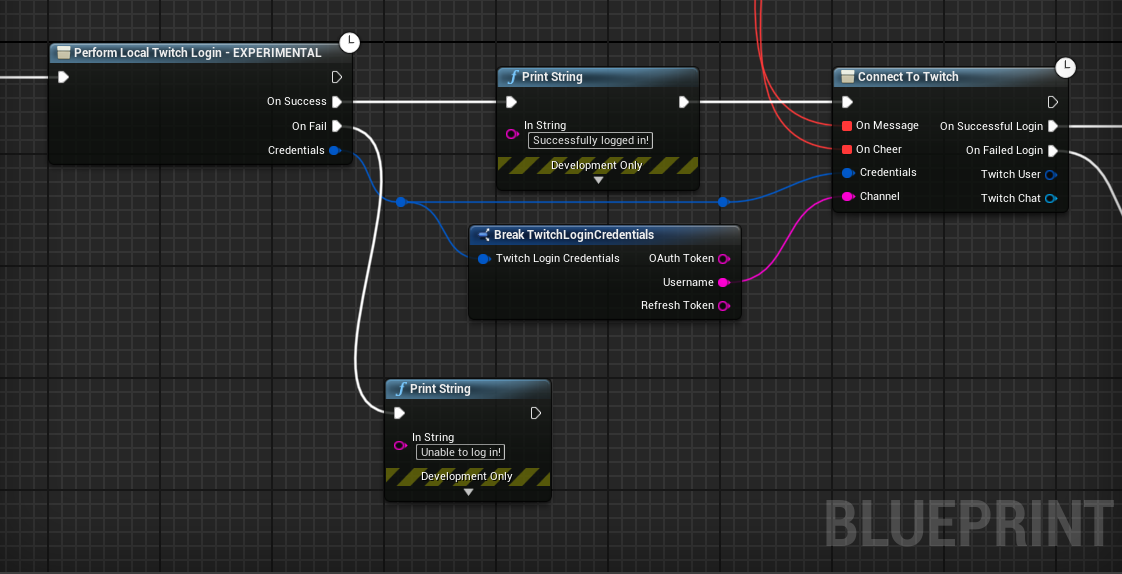
With that out of the way, start by opening up the blueprint you'd like to use to perform the login. Next, create the Perform Local Twitch Login node and connect it in a similar way as you would connect the regular Log in to Twitch node. Please refer to the quickstart guide for more information. We highly recommend you add some Print String statements to allow you to more easily debug any issues you may encounter. Please refer to the image below for a reference on what your Blueprint might look like:
That should be all of the steps required to set local log in up. If you run the blueprint nodes you just added, you should be sent to Twitch to authorize your application. Upon authorization, you will be sent back to the local web server, where you'll be greeted with a message much like the below:
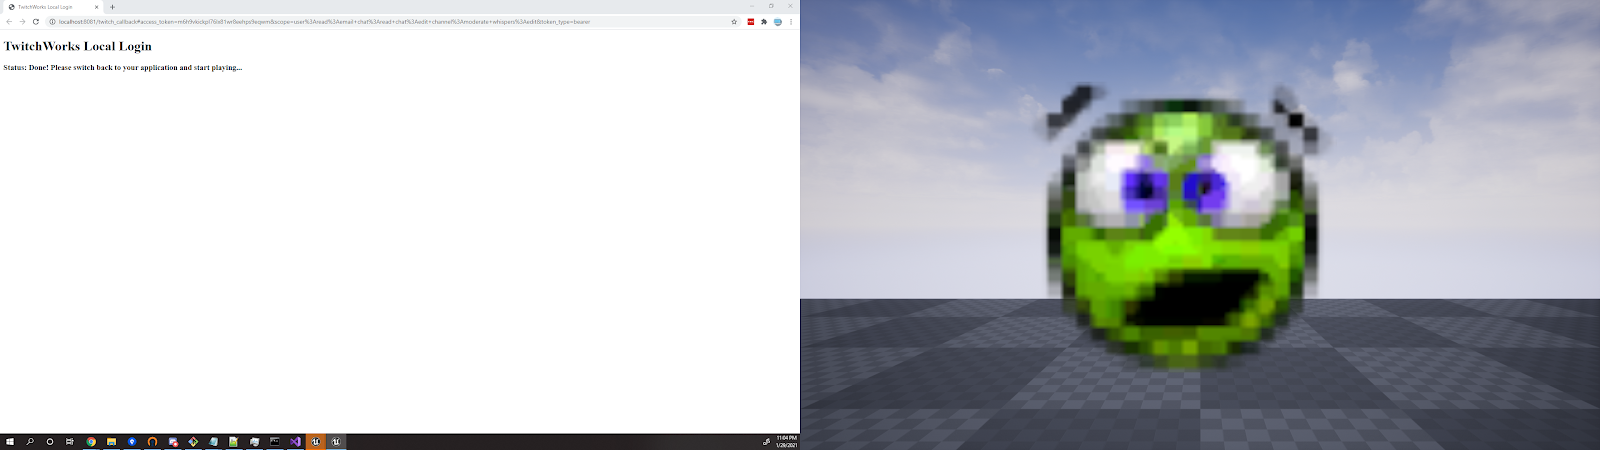
If you can see the Status: Done! Please switch back to your application and start playing... message, your game/application should already have picked up the login, and will fire the OnSuccess pin shortly.
Advanced Settings
Port Interference
Out-of-the-box, TwiWorks does not terminate the server after the login process has been completed. This is because Unreal Engine's embedded webserver framework does not automatically shut down once all route handlers have been removed. There is a way to forcefully shut down the web server, but this might interfere with other code that is using the embedded webserver framework. Because of this, TwiWorks does not perform this shutdown out-of-the-box.
The disadvantage of this is that, if you run multiple instances of the game or the editor (even after ending PIE) and an instance of the game, Local Login will not work. If this becomes a problem for you, you can enable the Stop all listeners on Local Login Complete option by checking the box in the local login settings. This will force the web server to terminate and free up the port as soon as the user completes the local login procedure.
OAuth Scopes
To gain access to all of TwiWorks' functionality, you may be required to add various OAuth scopes. You can also limit the scopes you request access to to make the Authorization box a user sees a little less daunting. You can find a list of all scopes and their descriptions here.
The scopes requested by the local login system can be configured by adding/removing elements to the Local Login Scopes section of the TwiWorks Local Login settings. A list of some of the most common OAuth scopes has been provided below:
user:read:chatuser:write:chatmoderator:read:chattersuser:read:subscriptionsmoderator:read:followersmoderator:manage:announcementsuser:read:whispersuser:manage:whispersmoderator:manage:banned_userschannel:read:redemptionschannel:manage:redemptionsmoderator:manage:chat_settingschannel:moderate
Customizing the login page
With version 2.0 of TwiWorks, it is possible to change the local login page without editing any C++ code! There are two parts that you can customize. The first is the JavaScript section that receives status updates and changes the web page's text, and the second is the HTML that is contained on the page. See the two sections below for instructions on both, as well as their defaults in case you'd like to revert.
- JS Code
- HTML Body
The localLoginUpdateJS settings property contains the code responsible for processing status updates. These status updates are triggered when an event, such as successful login or an error, occur. As of right now, the following statusses are supported. We highly recommend you enable a (verbose) default case, as this list of statusses is subject to change in th future.
ON_LOAD(Called when the webpage finishes loading)NO_HASH(Hash was missing in the URL; likely an authorization failure)ACCESS_TOKEN_OR_TYPE_MISSING(Missing the token/type from Twitch; likely an authorization failure)INVALID_TOKEN_TYPE(Invalid token type)WAITING_GAME(User's credentials have been submitted to the game, awaiting acknowledgement)DONE(Successfully completed login)
Whenever the system changes to one of the above mentioned states, it will notify you of it using a the updateStatus function. This function takes in a single string, the new_status parameter (function updateStatus (new_status)). You can specify the BODY of this function, so please ensure you don't include the function signature and wrapping brackets are optional. Please also note that JS libraries, such as jQuery and the like are NOT available. Please only use vanilla JavaScript.
The default implementation of this function has been provided below:
var user_msg = "";
switch (new_status) {
    case 'DONE':
        user_msg = "Done! Please switch back to your application and start playing";
        break;
    case 'WAITING_GAME':
        user_msg = "waiting for game to accept access token";
        break;
    case 'ON_LOAD':
        user_msg = "Processing...";
        break;
    default:
        user_msg = new_status;
}

document.getElementById("current_status").innerHTML = user_msg;
The above code will create a status message based on the statu that was passed in. It has custom messages for a few of the most common ones, and will pass all other status messages along to the user directly. It passes these messages along by updating the current_status span contained in the body HTML.
The localLoginHTMLBody settings property contains the content of the local login web page. It is copy-pasted directly into the <body> of the local login web page. We highly recommend you include a <noscript> tag for the edge case the user's browser either doesn't support or is blocking JavaScript content. Beyond this, you're free to change the code to your heart's desire - just make sure that you update the JS code if you edit the (ID of) any of the dynamic elements.
The default implementation of the local login page's HTML body can be found below:
<h1>TwitchWorks Local Login</h1>
<h3>Status: <span id="current_status">initializing</span>...</h3>
<noscript>Your browser does not support JavaScript! You'll need to enable JavaScript to use TwitchWorks Local Login</noscript>